Sunday 26 February 2012

Ginger Molasses Muffins to Warm the Heart


There is nothing better than the smell of ginger molasses muffins coming out of the oven on a Saturday morning. Especially when you are supposed to be working. So now I'm paying for it by falling asleep to my textbook at 11:30pm on a Saturday night. Damn procrastination. At least I accomplish something while I procrastinate, so I figure it's not so bad. 

First week back from reading break and the lovely irritable bowel syndrome goes kaboom on me. The constant pain and agony comes on day and night, night and day. Dragging myself through the long days of classes, volunteering and studying. The good thing that came out of this was my parents insisted on having my mom come to stay a while. I have finally faced the fact that crying on the phone to my parents  will not help my condition and will not help them worrying about my condition. So I caved. Now my mom is here. 

I know I am the most spoiled-rotten child with the best parents in the world. I truly truly ever so so so much appreciate what my parents do for me, I really do. To my friends who are putting themselves through school and/or going at this whole university thing all on their own, props. I admired you guys and think you are the most amazing people. There is no way I would be able to do what you do.

It's getting onto midnight and my eyelids are closing. So let's get on with the recipe.

This recipe is a spin-off from the spiced-ginger loaf from last week. I tweaked the recipe a bit, added molasses and kind of made it my own.

They made my place smell like heaven. Especially the fact that it has been raining and windy. We have been getting some sun, which is very nice, but on the most part, it's cloudy and rainy and REALLY windy. I am subjective when it comes to weather in victoria, particularly because I need a good excuse for these heart-warming muffins.


GINGER MOLASSES MUFFINS


Makes: 9 regular-sized muffins
Total time: 35 min
Working time: 10 min
Oven temp: 350F

Forgot about the bottle of fireball from last night, oops!

2 1/2 cups almond flour
1/2 tsp baking soda
1 tsp cinnamon
1/2 tsp nutmeg
1 tbsp freshly grated ginger
3 eggs
1/4 cup melted butter
1/3 cup honey
1/3 cup molasses
1/3 cup raisins (optional)
Didn't measure before melting... Exactly 1/4 cup after melting!


1. Combine all dry ingredients, including the ginger

2. Beat the eggs. Beat in all other wet ingredients. (Trick here is to put the butter in the measuring cup first then measure the others, lets the thick stickiness of the honey and molasses flow)
3. Put wet into dry and mix well.
4. If doing raisins... put the raisins in the microwave on high for 1 min with enough water to cover all the raisins. Drain then mix into batter.
5. Put batter in lined or greased muffin tin. (Lined works better for this)
6. Bake at 350F for 20-25 min
7. Try not to eat it right away, but it's hard to resist. Also, try it with the apple butter from last week too!
T@1
T@20
Note: They will get stickier as they cool. DON'T FEAR THE STICKY! It's ok to get your hands dirty while eating, it's ok.

Fresh out of the oven goodness:)

Saturday 18 February 2012

Dear Busy Bodies: Slow Cooker Coconut Lime Chicken

Fall off the bone chicken goodness. 
Last post of the reading break. Am I bored of cooking yet? Not a single bit. Wish so dearly I can cook like this all the time. If only eh? So Friday night, and I'm already thinking of my schedule for the next week and cooking for the next week. I guess this whole chicken business will last me at least 2 weeks. Assuming I don't eat it every meal. Which I can't. This is not a dish to have all the time. Now I know.

This dish is super easy. Honestly took me 5 minutes to throw everything together. Maybe I could've trimmed the chicken a bit. There was a significant amount of chicken grease. I spooned it out. As much as I could anyway. 

By cooking the chicken in a broth in the slow cooker, the meat just melted off the bones. I have no bones in the stuff that's in the fridge/freezer right now. It just falls right off! So if you are wanting to make this healthier, you can definitely go with chicken breast. All the meat gets juiced up and soaked in the sweetness of coconut and freshness of lime. Serve this on a bed of rice, quinoa, noodles, potatoes, or any starch and have whatever veges you want on the side and you've got yourself a meal. In my case, I've got myself at least 10 meals. My meals aren't big, I'm more a snacker than a mealer.

So here it is, last post of the reading break then it's back to one post a week. 

SLOW-COOKER COCONUT LIME CHICKEN

Total time: 4 hours
Actual working time 5 min

1 whole chicken (or whatever form of chicken you like)
1 can coconut milk (the standard size one)
1/2 can water
juice of 2 limes
3-4 slices of fresh ginger
2 tbsp brown sugar
salt to taste 
1. Put all your ingredients (except brown sugar and salt) in a slow cooker. Put chicken breast side down.
2. Cook on high for 4 hours.
3. Stir in the brown sugar and salt to taste at the end to prevent over-salting (I'm saying this because I over-salted)

*If you want to have natural sweetness instead, add some raisins into the cooking. I wish I did that instead of adding the brown sugar at the end. To be honest, the brown sugar was for compensating my over-saltedness, BUT, it really brings out the coconut milk sweetness, so I suggest add a little bit of sweetness to the mixture, whatever form you like.

Voila! You have yourself a super easy meal. No tending is needed. Although I tended quite a bit because I was impatient. Then the chicken burnt me. Some liquid splashed out. I have a small scar. Damn chicken. Now I shall have my revenge in devouring you!
My noseyness... I stabbed the chicken breast to let in the juices.
Enjoy!

Foods for the Soul- Spiced Ginger Loaf w/ Ginger Apple Butter


Ok, these are more foods for the fall but really, there is never a bad time for apple butter and a nice spiced loaf. Especially when the rain just keeps on coming down and the air hangs onto its winter chill. Also, you can't resist making apple butter when you bought the 10 apples for 2 dollars. Thank heaven for Root Cellar! 

This inspiration came from a jar of ginger pear butter in the renal dialysis unit that I volunteer in. It was the perfect balance of sweet and spicy. Since then, I wanted to make my own. Unfortunately, cheap pears were not available but apples were. So ginger apple butter it was. The loaf came from an inspiration when I was looking up a good ginger apple butter. It sounded too good to not try.

GINGER APPLE BUTTER

Thick, and sweet and warm to the heart.
Total time: 5.5 hours (not much tending to though)
Makes: approximately 4 cups of apple ginger butter

10 apples
3/4 cup apple juice
1/4 cup maple syrup
2-3 tbsp of grated ginger
3 tsp cinnamon
1 tsp nutmeg

1. Peel and core the apples. Chop into pieces.
2. Put everything in the slow cooker, cook on high for 3 hours.
3. Puree everything
4. Cook puree in slow cooker on high for 1.5 hours, uncovered. Stir once in a while.


You can definitely can it if you want or not and just use it up before it goes bad. I tried to can. I did can. But I don't trust my canning skills. This was my first time canning.

Made a lot more than what I can consume on my own, time for sharing!
SPICED GINGER LOAF
Inspired by http://www.roostblog.com/roost/a-harvest-gift-spiced-ginger-cakes-rosemary-apple-butter.html
Oven temp: 350F

2 1/2 cup almond flour
1/2 tsp baking soda
1 1/2 tsp cinnamon
4 tsp ground ginger
1/2 tsp cumin
1 tsp nutmeg
3 eggs
1/2 cup melted butter or oil
1/2 cup honey

1. Mix together all dry ingredients
2. Mix together all wet ingredients
3. Incorporate wet into dry until just mixed together
4. Bake in loaf pan for 45 min at 350F
5. Let cool for an hour before taking it out of the pan

This was quite a perfect combination. The apple butter was amazing on the loaf. The cumin in the loaf adds a little extra something to it. I took some to my massage therapist while the loaf was still warm. It was perfect timing as she is currently having a ton of ginger for her nausea from her pregnancy. Big congrats to Chantal and Perry, and Davis (the dog) in being parents/ big brother.

My whiteboard of craziness. 

Thursday 16 February 2012

A Girls' Valentine (Pt 2): Brownie Mango Trifle with Gerard Butler


Not the best photo, but we were in a hurry to eat these puppies up.

A Girl's Valentine Part II

Featuring: Black Bean Brownie and Mango Whipped Cream Trifle. And Gerard Butler. 

For the longest time, I was reluctant to try black bean brownies. I mean, black beans in brownies? I have tried my best to avoid this not-so-ordinary combination, I even went to the extent of whipping up 7 egg whites to make gluten-free brownies at 7am one time. Because really, BLACK BEANS! But now I know better. I have matured, in a black bean brownie sort of sense. 

These brownies are... refreshing. The doctor I work for tried it without the knowledge and said it's really good. He's a 6 foot tall hockey-playing guy. They are fudgey but light. Chocolatey and healthy. Satisfying and leaves you wanting for more. They are also very freezable! I have a batch in my freezer as we speak. Oh, they are also the simplest thing you can make! No chance of messing up here, seriously, not even my bake-challenged sister can mess up. 

Along with the brownie, I decided to pair it with a nice mango whipped cream. The whipped cream is pillowy, not super set, solid whipped cream, but pillowy and light. I was also hand whipping. Really should invest in a hand beater. Although it is very satisfying to make your own whipped cream. Makes you work off the calories too. Jenny also suggested that this can be served with just mango puree, which would make this totally healthy and still so good. 

BLACK BEAN BROWNIES
Adapted from http://blogs.babble.com/family-kitchen/2011/01/21/gluten-freeblack-bean-brownies/
Raw egg and black bean anyone?
1 540mL (19oz) can black beans
2 eggs
1/3 cup melted butter
1/3 cup cocoa powder
1/4 cup white sugar
1/4 cup brown sugar
2 tsp vanilla
1/2 tsp salt

1. Preheat oven to 350F
2. Drain and wash the black beans
3. Throw everything in a blender and blend until smooth
4. Pour into a greased 8"x8" pan and bake for 25 min
5. Eat it while it's hot! Nothing like spooning it right out of the hot pan!
Photo from batch 1- oh so good!

MANGO WHIPPED CREAM- pillowy style
So smooth, so tastey!
1 cup defrosted mango (or fresh if you have it)
1 cup whipping cream
3 tbsp icing sugar

1. Puree the mango
2. Add half the whipped cream in with the mango to blend- this makes it easier for the rest of it to whip up
3. Slowly mix icing sugar into whipping cream
4. Beat everything up until soft peaks form

THE TRIFLE
In the works!
Black bean brownie
Mango whipped cream
Strawberries

1. Spoon small bite-sized pieces of brownie into a glass for 1 layer
2. Spoon in mango whipped cream
3. Layer on chopped strawberries
4. Brownie pieces
5. Mango whipped cream
6. Strawberries
7. Brownie
....
I think you get the point.

Jenny brought cherry-creme chocolates. They make a great topping! And of course, we enjoyed these alongside PS I Love You and a beautiful Gerard Butler.


Behind the scene...
My blender is too small, I had to blend in batches then mix.

A Girls' Valentine (Pt 1): Turkey Meatballs & Spaghetti w/ Spinach Pesto


I'm awaiting for my meatballs, I like them hot:)

So, Valentine's day. A seemingly archaic "holiday" giving restaurants, floral shops and plenty of other businesses a gargantuan profit. Also an excuse for a girl to indulge in chocolate and wine and chick flicks. No need to fret my single ladies, who needs a man when you have balls. Meatballs that is. What else were you thinking?

This Valentine's day, I had a valentine and a date. My amazing friend Adam was my valentine, I even got a cupcake made for me! Except that happened in Calgary, and I'm in Victoria. So I also had a date, with Jenny. We even put on dresses for the occasion. 

This night featured a full menu. A salad, main course, dessert and wine. And a beautiful movie featuring Gerard Butler: PS I Love You. If I actually tried to fit it all onto one post, it would almost qualify as an essay. Ok, maybe not but it'd be too long. So we have part 1 and part 2. 

A Girl's Valentine- Part I

This part of the menu features strawberry spinach salad in balsamic vinaigrette, turkey meatballs with cranberry sauce, and spaghetti in spinach pesto. Let's hit these up one by one shall we?

STRAWBERRY SPINACH SALAD IN BALSAMIC VINAIGRETTE
Strawberries
Baby Spinach
Balsamic Vinaigrette
        -1 part olive oil
        -1 part balsamic vinegar
        -1/8 part brown sugar
        -salt and pepper to taste

When I say part, think ratio. 1/2 cup olive oil to 1/2 cup balsamic vinegar to 1tbsp or so of brown sugar. Make as much as you need for however many people you are feeding.


TURKEY MEATBALLS
Adapted from http://www.turkeyfarmersofcanada.ca/recipe/20171-Batch-Turkey-Meatballs/
Recipe makes approximately 20 medium sized meatballs.
1 pound ground turkey
1 egg
1 small onion- minced
2 cloves garlic- minced
1/2 cup ground almond
1 tbsp soy sauce
1 tbsp honey
1 tsp pepper
1 tsp chili powder
1 tsp italian seasoning

1. Preheat oven to 350F
2. Mix all ingredients in a bowl
3. Make your balls! And put on lined baking sheet.
4. Bake at 350F for 25 min

CRANBERRY SAUCE
1 part cranberries
2 part water
1/2 part white sugar
1. Bring mixture to boil
2. Let simmer for 5-10 min until mixture thickens
3. Lay on the balls

SPINACH PESTO
Recipe makes 1 1/2 cups pesto

2 cups packed spinach (no stem)
1 cup grated parmesan
3/4 cup walnuts
2-3 cloves garlic (depending on your garlic liking)
1/2 cup olive oil
1 lemon- juice and zest
salt and pepper to taste

1. Heat up a skillet- lightly toast walnuts... just until you start to smell the nuttiness. 
2. Throw everything in a blender until smooth.

SPAGHETTI

1. Make as much as necessary for however many you are serving. Cook according to package instructions.
2. Toss together with pesto right before serving.


Bon appetite!
Now, you serve all this with wine of course. And then you get right onto dessert:)

Sunday 12 February 2012

Butternut Squash Gnocchi is Simple... Right?

Butternut Squash Gnocchi tossed with Succulent Goodness


Today was productive. In terms of cooking anyway. School work? That went nowhere. In the past 2 days, I've only read 50 pages. I'm half way through. This is for abnormal psychology. Love the course, not so much the readings.

Rosemary Infused Olive Oil
I made a lot of things today. Well, I felt like I did. Here is a list:
1. Rosemary infused olive oil
2. Roasted yellow pepper
3. Roasted grape tomatoes
4. Roasted butternut squash (I guess this is part of the gnocchi)
5. Spinach pesto
6. Butternut squash gnocchi
7. Ginger apple butter (currently in progress)

Not everything turned out the way it was supposed to. The rosemary infused olive oil didn't. It is lacking in rosemary flavours. I'll try it again another time. Everything else turned out pretty good. Well, the apple butter is still in progress. But it smells lovely in here right now. Technically I am triple-tasking right now. Writing the blog, skyping my mom, and making apple butter. Props right? Right?

In today's blog, I will feature the roasting and the gnocchi. The spinach pesto is for Valentine's day. I got myself a valentine, not that valentine's day is really a big deal.

ROASTED YELLOW PEPPER
Smells good, looks good, tastes good.
Oven temp: 425F
Total Time: 30 min

Yellow peppers
Olive oil
Salt and Pepper

1. Preheat the oven!
2. Slice the yellow peppers into big wedges
3. Place yellow peppers onto lined baking sheet, be sure they don't overlap
4. Drizzle olive oil over. Just a drizzle.
5. Salt and pepper them peppers.
6. Bake at 425F for 25 min. I put my oven on convection and put it on the top shelf because I was also roasting the butternut squash. This gave the peppers a nice colour too.


ROASTED GRAPE TOMATOES
They're good not roasted... they''re amazing after roastage
Oven temp: 425F
Total time: 20 min

Grape tomatoes
Olive oil
Salt and Pepper


1. Preheat the oven!
2. Slice the grape tomatoes in half
3. Place the grape tomatoes on a baking pan, or lined baking sheet, be sure they don't overlap
4. Drizzle olive oil over. Just a drizzle.
5. Salt and pepper. Don't be light on this, it really brings out the flavour a lot!
6. Bake at 425F for 15 min.


BUTTERNUT SQUASH GNOCCHI
Inspired by Jerry James Stone on http://www.treehugger.com/easy-vegetarian-recipes/butternut-squash-gnocchi.html
Pre-cooked gnocchi
Total time: it's a half day project, but not working on it all the time
Total working time: 40 min (plus clean up... making it 90 min for me)
Serves: 6 (I think, I have a bunch left over because I'm eating solo)

Ingredients
1 small butternut squash --> use total 2 cups in the gnocchi
1 1/2 cup GF flour (or just normal flour) + 1/2 cup for dusting
1 egg
1 cup finely grated parmesan
1 tsp nutmeg
1/2 tsp salt

Roasting the Squash
4 quadrants. Don't worry about the liquid in there, it went away after it cooled.
1. Preheat oven to 425F
2. Slice squash into 4 quadrants: widthwise by the bulb part then length wise. Scrape out the seeds inside
3. Put in a baking dish with 1/8 inch of water on the bottom
4. Over with foil and bake at 425 in middle rack for 1 hour.
5. COMPLETELY COOL THE SQUASH! (or you end up cooking the egg)

Making the Gnocchi
Dough- pre-mixing
Dough- done-mixing
1. Take 2 cups of the roasted butternut squash, mash well.
2. Combine butternut squash, grated parmesan, egg, nutmeg, salt and 1/2 cup flour.
3. As you work the mixture, gradually add in the rest of the flour. You may not need to add all of the flour, depending on how wet your squash was.
4. Once the mixture is still wet to touch but can start to form individual ball forms and hold, try one in a pot of bubbling water (don't want it to be boiling boiling, but bubbling and hot). If it doesn't fall apart, you're good. If it does, add more flour.
5. Flour your working surface really well. Flour a plate or something to hold the uncooked gnocchi
6. Take a portion of the dough (it will be really wet) and roll into log shape in flour like so:
Take one: dirty hands on camera
Take two: clean hands on camera... roll with spatula
7. Use a fork, or just your fingers, to form evenly sized balls of dough. They do expand quite a bit so probably grape tomato size is good. Set aside on floured plate.
8. Carefully, one at a time, place in a pot of bubbling water.
9. Gnocchi is ready when it floats to the top!
Wait for them to float!
10. Carefully scoop out and let strain on a strainer.
11. Toss with your choice of light sauce. I used rosemary infused olive oil and also tossed it with some of the roasted pepper and grape tomatoes.

Other possibilities:
- melted butter lemon sauce
- olive oil with anything else you want in it
- light cream sauce

Basically anything that's on the light side. The gnocchi is quite sweet of butternut squash flavours on their own and it's important to still allow that flavour (and the nutmeg too) to shine through.

A good gnocchi should have a bit of a bite to it, not squishy or hard:)

If you want to freeze any left overs... Freeze before you cook it! Also make sure you freeze them individually first, not touching each other before putting them in a bag like me I did=)

Frozen left overs!
And just to answer the question from the post title. Yes, butternut squash gnocchi is simple. It's elegant and oh so tastey. Enjoy!

Saturday 11 February 2012

Fancy Pants with Shrimp in Orange Red Wine Reduction Sauce


Reading break! Well, reading week more like. A week of reading. With commitment to cooking to the side. I have got a line up of cooking and baking to do. This is including experimental gnocchi coming up tomorrow and ginger apple butter which I'm super duper stoked about.

Since this is the first post of this series and it has been a week since my last one, I will briefly update you on my crazy life. Serious. Crazy. Life. I am now volunteering 3 days a week with permanently scheduled times, another volunteer post at school helping recruit volunteers, and still working, and completely dropping the ball at school. I lived on 6 hours of sleep a night and much too big of cups of coffee. Although I have managed to go to the gym everyday for so many days that I have lost track. It's my outlet for the built up anger/frustration/depression/misery/stress and sorts. It works, for while I'm there. Otherwise, my poor parents have been taking it all. Thank goodness for parents. 

I think that is enough about my rant on the current life or lack of actual life. We should get to tonight's feature. Shrimp in orange red wine reduction sauce. That's the basis of it. I put it on a bed of slightly cooked arugula. I would LOVE to have it as just arugula salad and I think it would be absolutely fantastic, but with my present intestinal issues, it's not the best for me to eat raw anything.

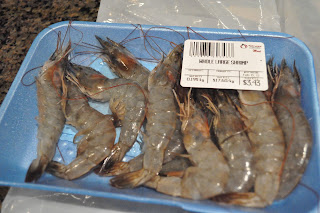
This came from an inspirational scallop recipe. It has nothing to do with any part of the scallop recipe, except for the seafood part. The grocery store had fresh shrimp, I had to jump at the opportunity.

Fresh, never frozen. Actually!

My friend Erin and I also bought a bottle of sweet red yesterday, so I wanted to do something that would pair well with that. This is a mixed wine from Australia and it is quite sweet. But it was cheap. And it's good. They were sampling it at the liquor store. 

This took surprisingly little amount of time. For those of you who cook during the week, it's definitely a good quick fancy dinner for the weekday. I was eating, looked at the clock and realized I was at they gym an hour ago. And by then I had already showered and put on a load of dryer and washer. And so here it is. Something a little fancier, and oh so tasty to kick off the week of reading and cooking and blogging.


SHRIMP IN ORANGE RED WINE REDUCTION

Time: 20 min
Serves 1--> or more if you want to double

Ingredients

6 shrimp (shrimps)**
1 large shallot
Juice of 1 large orange (about 1/2 cup)
zest of 1/2 an orange
1/4 cup sweet red wine
1 tsp cooking oil
salt and pepper to taste
**any kind you want, I just happen to have fresh ones, but DON'T defrost if you use frozen!

Directions


Look at that yumminess!


1. Slice the shallot into thin rings.
2. Heat oil in a skillet on high heat until hot.
3. Put shallot into hot oil/skillet then turn it to medium heat.
4. Cook shallot until it starts to soften. Salt and pepper to your liking.
5. Add orange juice. Be careful here, there will be steam. And lots of it. I learned the hard way. Let the mixture cook until it reduces and thickens a bit.
6. Add wine. Again, cooking until it starts to reduce.
7. Add the shrimp. Cook until shrimp is cooked through.
8. Plate the shrimp on whatever greens you like (something dark though, not lettuce, please don't put it on lettuce, unless it's the nice kind). Or serve as is like an appetizer.

Happy fancy mealing:)

I decided to add a fancy slice of orange and plate it all nicely and such.

Sunday 5 February 2012

Mac n' Cheese Whizzed

Lovin' the orange! ps, I used gluten free pasta. KD and cheese whiz are probably not completely gluten-free but ah well!

Cheez Whiz, KD and a rather large banana.

Kraft dinner? Yes, kraft dinner. With chees whiz. Sounds like the most disgusting combination and definitely not something to be featured on a food blog right? Well, there's a story behind this. Laura. I've been friends with Laura for almost 9 years now. We met in grade 7. That was forever ago. To be honest, I don't miss those days. Junior high was not the highlight was anyone's life. It was a time of social awkwardness and cliquey teenagers. What I do miss from those days were times spent with Laura after school eating KD with cheese whiz. She still makes it better. Creamy, almost soupy mac n' cheese. It actually became a requested food item when I went to her house. Along with our mac n' cheese, we would have sundaes after. Those were the days, when I didn't feel sick after doing that to my body. 

So ever since I had this blog idea, I've been wanting to feature this. It's nothing gourmet, it's nothing fancy, it's completely bad for you. But it's heart-warming, cozy, and comforting. This was a week for a comforting dish. Things are going nuts. As if I wasn't doing enough outside of school, I am now doing another day with Special Olympics, signing on for a more permanent volunteer position at school, and getting more involved in Psi Chi (psychology honours society). I figure all this will eventually land me into med school. Eventually, hopefully, maybe. If not, I will just cook and eat for the rest of my life. Both of which are very enjoyable.

Let's not drag this on... here's the recipe!


Mac n' Cheese Whizzed
*courtesy of Laura*

Total time: 15min
Serves: 2 or 1 if you're hungry

Ingredients


1 box Kraft Dinner-- the orangey stuff, that's the stuff
2 tbsp Butter
3 tbsp Chees Whiz-- if you're going to do this, might as well go with the full fat original
1/3-1/2 cup milk-- depending on how soupy you want it


Directions
Butter up!
Yummy Cheez Whiz!

1. Cook the pasta, then drain
2. Return pasta to the pot, add butter.
3. Once butter is mostly melted, add the cheese whiz.
4. Once the cheese whiz is mostly melted, add that orange goodness of KD cheese powder.
5. Stir until well incorporated.
6. Add milk and stir until nice and creamy.
7. Serve it up!

Kelsey and I made this. We figured we would balance it with a spinach salad on the side. Then butter pecan ice cream with Ides of March later that night.


I also thoroughly enjoyed my mac n' cheese comfort while rocking my jammies. I love jammies.