Saturday 31 March 2012

Pre-exam Study Sesh Comfort- Pumpkin Muffins


Deliciously stacked:)

Another week goes by! This week went by really quick. To be honest, I don't even know what happened to my time. Right at this moment, I am blanking on my week. There were some highlights of course, like going out for a lovely dinner date at The Tapa Bar last night. Nothing quite like care-free time with amazing company:) A not-so-great highlight was my night volunteering... longest hour of my life! Constantly tapped, a child rolled on my knees, children not listening... just absolute chaos. However, that's passed. There are moments in there that make it all worth the while. Every smile I see beaming from these kids' faces-- worth all the while.

Speaking of another week goes by, there is only 4 more days of classes left until final exam period! I only have 1 more biochemistry lecture! One more biochemistry test! Then NO MORE BIOCHEMISTRY!!!! It really is not that I don't enjoy the material, I do, it's interesting. I love learning about the chemistry of the body, I just don't have the brains for it. My mind does not work the way biochemists' brains do. Ah well, I have managed to make my way through 7 months of it. But seriously, no more after this. No more.

In the mist of rushing through the last bits of the semester, I am finding myself not really that stressed. I know I have A LOT of studying ahead of me, but maybe the bliss of being in a new relationship is taking that stress away. I am no longer feeling lonely and miserable. I am happy, all the friggin' time. It's kind of ridiculous. You know how awkward it is to walk down the street by yourself and all of a sudden you just get this beaming smile on your face? People generally think you're crazy, or if not crazy, just plain weird.

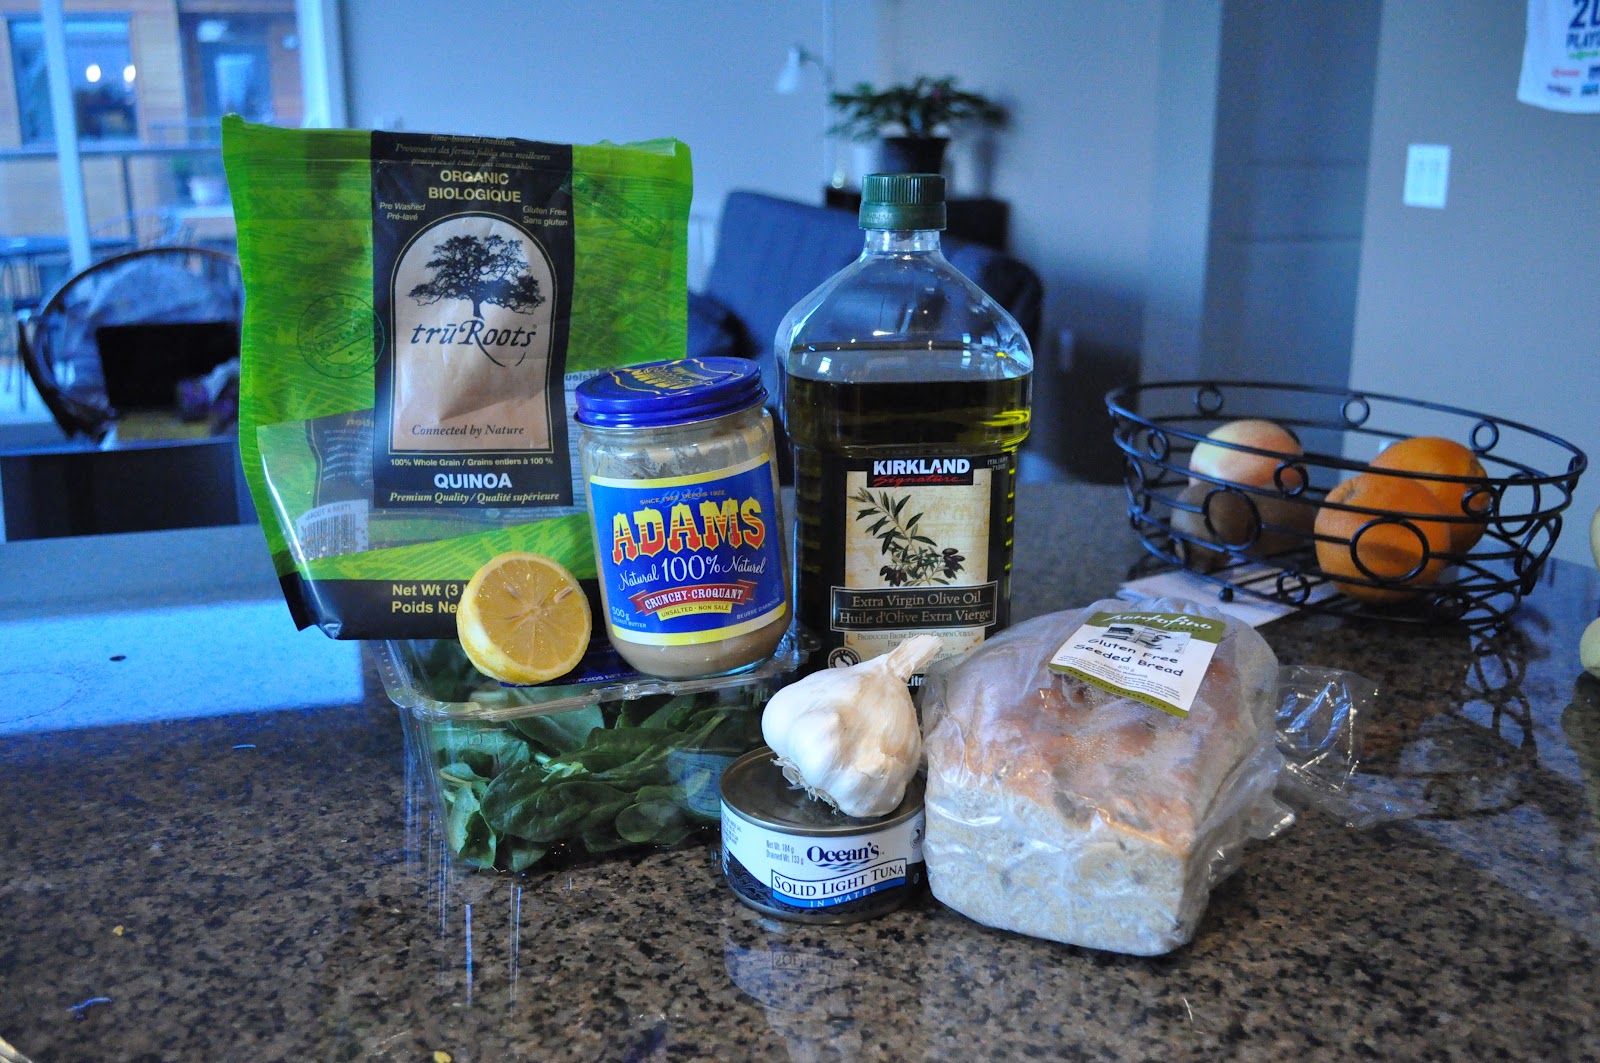
However, with that said, I do have 2 intense studying sessions coming up this weekend. Biochemistry tomorrow, neuroscience on Sunday. Two very intense subjects. Two tests I'm very very afraid for. Yikes. Yup, it's going to be quite a weekend. Hence, I have made some comfort food in my super productive Friday. So Friday afternoon/night: groceries, 3 loads of laundry (all put away too!), pumpkin muffins, an actually fresh made dinner, 2 lectures worth of biochemistry reading, time to blog, and some quality time with my new guy.

Pumpkin muffins. I know what you're thinking, pumpkin in spring? Well, first off, it's not really spring here. Second, I love pumpkin baked goods. Third, I bought this can of pumpkin in the fall when they first came out and I have been dying to use it. These will make for a great treat for tomorrow's study sesh with my biochem girlies.

These were also another one of my personally devised recipes. It turned out great! Also, I learned a very very very important lesson in cooking... READ THE LABELS! I totally thought I bought all purpose gluten free flour but I didn't... I bought spelt flour. WTF right? I don't even know. But it's all good. I don't need to eat gluten free. Although I'm sure this will work great with all purpose gluten free flour too. I also blundered on the nutmeg, but I managed to fix that one. Thought it was the cinnamon at first. Oops.
It says stoneground organic SPELT FLOUR!

PUMPKIN MUFFINS


These babies smell amazing!
Total time: 45 min
Working time: 10 min
Oven temp: 350F
Makes: 12 hearty muffins

1 cup spelt flour
1 cup garbanzo bean flour
1 tsp baking powder
1/2 tsp baking soda
2 tsp cinnamon
1/2 tsp nutmeg
1 tsp ground ginger
1/2 tsp salt
1/4 cup millet
1/4 cup unsweetened shredded coconut
1/3 cup melted butter
1/2 cup maple syrup
2 eggs
1 can pumpkin (not the pie filling!)
1/2 cup plain yogurt

1. Mix all dry ingredients together
2. Beat the eggs, then whisk in all the rest of the wet ingredients.
3. Add the millet and coconut to the wet.
4. Mix the dry into the wet in batches until just incorporated
5. Pout into lined muffin tin
6. Bake at 350F for 30-35 min

In the oven... waiting Waiting WAITING
ENJOY!

Fresh out of the oven!

Saturday 24 March 2012

Carrot Coffee Cake Made Healthy?!?!


Another week goes by. Been a relatively fast week I suppose. Last weekend seemed like a blur; being away really makes time go by so much faster. This last week was the 3rd last week of school. 2 more to go. 3 non-cumulative 2 cumulative tests left. April 19 can't come any sooner. That's my last exam during exam period, and it has to be a 7pm one. At least it's non-cumulative.

With so little time left to school, I really should get going on my studying and bonus assignments. Instead, I have taken the last hour off. Baking, cleaning the kitchen, sweeping the floor. And now writing. I figured I'm going to have to get up soon anyway to take the carrot cake out of the oven, I might as well do something else so I don't interrupt my studying too much. I still have to make my way to the liquor store to return some bottles. I also had plans to do the recycling. I also had a thought of going for a run because it is clear blue skies outside. I have managed to stay in all day still. It's almost 4pm. All these beautiful plans never really work out... Ah well.

Even though there's so little time left for school and the fact that I'm not doing the best in any of my classes, I'm surprisingly not that stressed about it. I'm just kind of coasting through. Doing what I can. Not getting enough sleep still. There are some things that are worth trading off for sleep sometimes, like talking until 2am with an absolutely incredible guy even though you know you have to get up in 5 hours.

Let's cut to the chase shall we?

The kitchen right after I have put the cake in the oven.

Carrot cake. It sounds healthy right? The moist carrot cake with the thick white frosting sitting on the shelf in a bakery that's calling your name every time you walk by is healthy right? It has carrot in it! Well... I'm sure it's not news to any of you, that deliciousness may sound healthy because it has carrot in it, but it is a sugar butter concoction of happiness. Yes, I'm happiness, it makes me happy. But, since we can't be having sugary butter concoctions all the time, I have devised a healthy, gluten-free version. I also added some icing onto half the batch for my gym buddy Branwen. She has driven me to and from the gym countless times and this is my little something for her. And since we go to the gym, I can add the icing sugar on top for an extra kick.
Iced carrot coffee cake for Branwen!

Again, I came up with this recipe all on my own and crossed my fingers praying it will work. And it did!

Gluten-Free Carrot Coffee Cake


Total time: 50 min
Actual working time: 10 min
Oven temp: 350F

Note the size of the carrot!

1 1/2 cup all-purpose gluten-free flour
1/2 cup garbanzo bean flour
1 tsp baking powder
1/2 tsp baking soda
1 tsp cinnamon
1/2 tsp nutmeg
1/2 tsp salt
3/4 cup finely grated carrot (about 1 medium)
1/2 can of crushed pineapple, drained (14 oz can)
3 eggs
1/2 cup applesauce
1/4 cup maple syrup
1/2 cup plain yogurt
2 tbsp oil

1. Mix all the dry ingredients (flours and such).
2. Mix in the carrot and pineapple, coat it thoroughly.
3. Beat the eggs then add all the rest of the wet ingredients and beat together lightly.
4. Mix the wet into the dry ingredients until just mixed together.
5. Pour mixture into a greased 9" square pan
6. Bake at 350F for 40min

Voila!

**I was totally going to add raisins and I was an airhead today and completely forgot. If you do add raisins, it'll add a little sweetness to it too. Be sure to microwave the raisins in some water and let soak until they're plump before you add them!

NOTES FOR IMPROVEMENT:
1. Add them raisins if you don't want to add more maple syrup.
2. Save the pineapple juice, reduce it so it thickens a bit. Poke some holes in the cake right when it comes out of the oven, then drizzle the concentrated pineapple juice for extra sweetness and moisture.
3. Perhaps add a little more yogurt (1/4 to 1/3 cup) if you want real moist cake.

Happy healthy eating!

I took this piece out as soon as it came out of the oven :)

Friday 16 March 2012

Everything-Free Mango Coconut Bars


Go free with these goodies!
They're screaming: EAT ME!!!
An early post for this week! This is because I took Thursday off. I took Thursday day because I am currently sitting in the living room of my home in Calgary. I'm sitting in the living room of my home in Calgary because I have finally made it... an interview with med school. This is all very exciting, hence, it's past midnight and I have to wake up at 7am, yet I'm not going to sleep. Instead, I'm writing. To hopefully put me at ease.

It has been a crazy week too with a midterm on Monday, Tuesday, Wednesday and Thursday. Finger crossed I did alright on them. I have mixed feelings. Despite my studying for midterms, I am still constantly thinking of new ideas and something to post for the week, especially when it needs to be something easy, simple and portable, as I brought these bars from Victoria to Calgary. My sister loves me, or she loves my food. 

This was inspired by a recipe on The Spunky Coconut. The original recipe is pumpkin chai bars but the recipe didn't really call for things out of my pantry. I do still have a can of pumpkin I've been dying to bake something with, but none of the other fancy stuff. And, let's get real here, after a week of craziness, I don't want to go buy fancy things, I just want to make something good.

So I wrote a recipe. Then prayed that it would turn out. And it did. And it's pretty much everything free, except for nuts, which happens to be a problem since the guy I've been seeing is allergic to tree nuts. Damn, I should've figured that out earlier! Ah well, future recipe inspiration: allergen free! You're probably thinking good luck with that right? I know I am.

Mango coconut bars. Gluten-free. Sugar-free. Dairy-free. Soy-free. Casein-free. Vegan. Raw. I was just trying to make the list as long as possible, but seriously, all of that in this simple little recipe. Ok, so I just checked out something. Cross out vegan. I put gelatin in it. Dang! I was close though!

These bars were super simple. And if I had a proper food processor, or just a better blender, it would have been as easy as A-B-C. They're good for you too! Packed with all sorts of good stuff from the apricots, the walnuts, and coconut and mango. Nothing artificial, nothing bad. Just full of goodness!

MANGO COCONUT BARS

Time: 15-20 min (with proper equipment)
Oven temp: 0C--> no cooking required!
Need: 8" square pan and blender/food processor

Base

1 cup walnuts
1 cup dried apricots
1/2 cup unsweetened shredded coconut

1. Microwave the apricots with 1/3 cup of water for 1 min. Then cover and let soak until you're ready for them.
2. Throw the walnuts in the blender and blend until it's fine. Slightly more coarse than brown sugar.
3. Throw the apricots in the blender and blend away until it's quite fine (not as fine as the walnut though).
4. Mix all the ingredients together and press on the pan until tightly pack.
***If you have a good blender or food processor, you can just throw everything in there to pulse until it forms a ball.***
Coconut, Walnut. Photo taken by a nut (me)
Pack it all in!


Topping

2 cups mango
1/3 cup natural coconut spread- melted
1/2 tbsp maple syrup
juice of half a lemon
1/2 tsp nutmeg
2/3 pack of gelatin

1. Puree everything together except for the gelatin.
2. Microwave half the puree 3 x 30sec on high (or until the mixture steams)
3. Slowly mix in the gelatin into the hot mixture, be sure it does not clump up.
4. Add the rest of the mixture in there.
5. Pour on the base.

Final step: refrigerate for at least an hour for it to set.
Wait for it to set. Wait for it.

Then you can enjoy the healthy deliciousness of these bars:)

NOW GO FOR IT!

Monday 12 March 2012

Lemon Coriander Cookies- My 1st GF Cookie


Started studying today at 10am, it is now 11pm. No, I didn't study the ENTIRE day, probably had a total of 2-3 hours of break. But I also did the same thing yesterday. My brain is fried, like some good ol' southwestern fried chicken. Forgive for the fried chicken reference, I've been listening to The Help audiobook. It is a fantastic audiobook. Fantastic movie. And fantastic book.

Now I really should get on finishing this post so I can get a decent amount of sleep to brace my Monday, Tuesday, Wednesday, Thursday midterms. Plus, a huge exciting weekend in Edmonton for an interview!

So this is my first time making gluten-free cookies, first time ever. Never followed another recipe, have read quite a few recipes using all sorts of different flours. I was going to make this with coconut flour BUT it's kinda crazy expensive. I ended up standing in front of the flours for 15 minutes, all the while knowing I will be late for the last Special Olympics swim practice debating between quinoa flour (which is also super expensive), brown rice flour, white rice flour, garbanzo bean flour, or just walk out of the store after 15 minutes of debating. I finally settled for garbanzo bean flour. Read the back of a cookie mix and that was the main flour used. Walking out of the store, I was hoping and praying that these cookies will turn out.

That night, instead of getting onto studying for one of my 4 midterms, I wrote a recipe instead. Didn't take that long, but I was excited. I haven't even opened the pack of flour to see what it's texture is like, I just wrote a recipe. And guess what? It gave me real delicious cookies!

The lemon coriander part was inspired by the smell of coriander. My mom bought dried coriander last week, as soon as I smelled it I thought: lemon coriander cookies with white chocolate chips.

Hence, I present...

LEMON CORIANDER COOKIES WITH WHITE CHOCOLATE CHIPS

Total time: 20 min
Bake time: 12 min
Oven temp: 350F
Makes: approximately 20 cookies

Just one egg left... no problemo!
3/4 cup garbanzo bean flour
1/4 cup almond flour
1/4 tsp baking soda
pinch of salt
1 tsp dried coriander
zest of 1/2 lemon
1/3 cup butter
1/8 cup white sugar
1/8 cup brown sugar
1 egg
1/2 tsp vanilla extract
1/4 cup white chocolate chips

1. Mix all dry ingredients (lemon zest included)
2. Cream together butter and sugars, then add egg and vanilla extract. Mix well.
3. Pour dry ingredients into wet and mix-- when half incorporated, add the white chocolate chips, then keep mixing until just incorporated
*the dough will be quite wet for a cookie dough, but it will turn out, believe me!
4. Form small balls and slightly flatten--> bake on lined cookie sheet for 12min at 350F. Edges should be starting to brown.
*Make sure the balls are small-ish, they do spread quite a bit.

slightly wet dough
Small is key!


Note on eating: if you eat them fresh, they will be crisp and delicious; if you eat them way later (the next day), they will be soft and delicious. Consume either way, and enjoy, savour, the lemoniness and sweetness and just overall OMG in your mouth.

mmm fresh cookies!
Please do not be deterred by garbanzo bean flour. Yes, it's ground chickpeas. That may be a little weird. The dough did taste like chickpeas in a weird sort of way but once they're baked, you can't even tell. Even the pickiest eater I know liked it and can't tell there's a chickpea taste to it.

Sunday 4 March 2012

Never Fear Lunch Again!


Ok, so I didn't have a main/cover photo for this post. Forgive me, please. That was my bunch of hair to donate. 12 inches of hair.

Lunch, you know that meal that you scramble to get together before running out the door at 8am? Or you have simply given up getting it together and now resort to something like Subway. This is the meal that a lot of people neglect. They go with the same old sandwich, or cheese and crackers, or in my case... shove a few pieces of fruit in my backpack and that would be my lunch. But with very small amount of effort and a few essentials from your pantry, you can make some really really good lunches.

The idea of having a post on 5 days of lunches came from a comment that a friend made while we were studying. I pulled out my sandwich, you can smell the peanut butter, then she asked "what is that red thing in your sandwich?". It was apple slices. She then went on saying that she is so tired of the lunches that she packs and it's just so much easier to buy something on campus or just suck it up and eat the same old boring thing again. So came this idea: 5 days worth of lunches with pantry materials. 

To be honest, I'm kind of a hippocrate. I enjoyed myself very thoroughly this past week while I was eating delectable lunches. Now, the chances are very high that I will return to my same old stare at my fridge to see what I can bring, then leave the house with a frozen muffin and some pieces of fruit. 

Enough of the blabbering, let's get to the main ingredient. Literally.

These are simple ingredients, easily substituted. Things you SHOULD have in your pantry, or easy essentials to get from the store.
Spinach
Lemon
Peanut Butter--> can be other nut butters as well
Olive oil (or any type of vegetable oil)
Tuna--> for my vegetarian friends: chickpeas. I know you have cans of that stuff.
Bread
Quinoa--> or any type of pasta, depending on what you're doing with it
Garlic

With the quinoa, you can cook up a batch of it and leave it in the fridge for the week. And when you're mixing up things with quinoa, it is so versatile, you can practically add anything. 

Now I made a spinach pesto, another kind of spinach pesto. No nuts, no cheese. Just spinach, garlic and lemon.

Spinch Pesto

2 cups spinach (packed)
1/4 olive oil
2 cloves garlic
juice and zest of 1/2 lemon
1/2 tsp salt
pepper to taste

Put all the ingredients in a blender. Tip: don't add all the spinach at once, otherwise it's too dry to blend. Let it blend up and puree with some of the liquid first then go on and add the rest.

Makes 1/2- 3/4 cup.

Day 1- Quinoa with Spinach pesto

Quinoa
Spinach pesto

Add spinach pesto to quinoa to your taste-liking. I also added some strawberries and walnuts. Feel free to throw in anything from your kitchen!


Day 2- Peanut Buttered-Tuna Sandwich

Tuna
Peanut butter
Spinach
Bread

1. Melt 1 1/2 tbsp of peanut butter in the microwave
2. Mix the peanut butter with 1/4 cup of tuna

I also added some curry powder, ground ginger and pepper to the mix. 
Now put the sandwich together!


Day 3- PB and Pesto Sandwich

Peanut butter
Pesto
Bread

Simple enough. Spread each on a slice of bread. Put them together. Voila! You have yourself a gourmet peanut butter sandwich. I know it sounds like an odd mixture but trust me, it was really tasty. Added to my version of this was apple slices!


Day 4- Tuna and Spinach Quinoa Salad

Tuna
Spinach
Quinoa

1. Chop your spinach into thinner slices
2. Mix the ingredients together.

I also added the spinach pesto to this since I had tons of it left still. Then I also added dried cranberries and later on some kiwi as well. Throw in whatever you like! Let your creativity flow!


Day 5- GRAND FINALE- Tuna-Quinoa-Pesto on Peanut Buttered Bread

When I say throw everything together, I mean throw everything together.

Tuna
Quinoa
Spinach pesto
Peanut butter
Spinach
Bread

1. Mix together some tuna, quinoa and pesto. Make sure it binds together well. More tuna, less quinoa.
2. Spread peanut butter on your bread.
3. Lay on those beautiful spinach leaves
4. Put the tuna mixture on top 
5. Lay on the other slice of bread


There you have it. 5 days of innovative lunches. You can say they're borderline gourmet, or gourmet. Pesto makes everything gourmet, or so I'd like to think. Surely, there're so many other variety of things you can do with those simple ingredients. Experiment with it a little. Have fun with it. And I guarantee you will look forward to eating lunch again.

Sunday 26 February 2012

Ginger Molasses Muffins to Warm the Heart


There is nothing better than the smell of ginger molasses muffins coming out of the oven on a Saturday morning. Especially when you are supposed to be working. So now I'm paying for it by falling asleep to my textbook at 11:30pm on a Saturday night. Damn procrastination. At least I accomplish something while I procrastinate, so I figure it's not so bad. 

First week back from reading break and the lovely irritable bowel syndrome goes kaboom on me. The constant pain and agony comes on day and night, night and day. Dragging myself through the long days of classes, volunteering and studying. The good thing that came out of this was my parents insisted on having my mom come to stay a while. I have finally faced the fact that crying on the phone to my parents  will not help my condition and will not help them worrying about my condition. So I caved. Now my mom is here. 

I know I am the most spoiled-rotten child with the best parents in the world. I truly truly ever so so so much appreciate what my parents do for me, I really do. To my friends who are putting themselves through school and/or going at this whole university thing all on their own, props. I admired you guys and think you are the most amazing people. There is no way I would be able to do what you do.

It's getting onto midnight and my eyelids are closing. So let's get on with the recipe.

This recipe is a spin-off from the spiced-ginger loaf from last week. I tweaked the recipe a bit, added molasses and kind of made it my own.

They made my place smell like heaven. Especially the fact that it has been raining and windy. We have been getting some sun, which is very nice, but on the most part, it's cloudy and rainy and REALLY windy. I am subjective when it comes to weather in victoria, particularly because I need a good excuse for these heart-warming muffins.


GINGER MOLASSES MUFFINS


Makes: 9 regular-sized muffins
Total time: 35 min
Working time: 10 min
Oven temp: 350F

Forgot about the bottle of fireball from last night, oops!

2 1/2 cups almond flour
1/2 tsp baking soda
1 tsp cinnamon
1/2 tsp nutmeg
1 tbsp freshly grated ginger
3 eggs
1/4 cup melted butter
1/3 cup honey
1/3 cup molasses
1/3 cup raisins (optional)
Didn't measure before melting... Exactly 1/4 cup after melting!


1. Combine all dry ingredients, including the ginger

2. Beat the eggs. Beat in all other wet ingredients. (Trick here is to put the butter in the measuring cup first then measure the others, lets the thick stickiness of the honey and molasses flow)
3. Put wet into dry and mix well.
4. If doing raisins... put the raisins in the microwave on high for 1 min with enough water to cover all the raisins. Drain then mix into batter.
5. Put batter in lined or greased muffin tin. (Lined works better for this)
6. Bake at 350F for 20-25 min
7. Try not to eat it right away, but it's hard to resist. Also, try it with the apple butter from last week too!
T@1
T@20
Note: They will get stickier as they cool. DON'T FEAR THE STICKY! It's ok to get your hands dirty while eating, it's ok.

Fresh out of the oven goodness:)

Saturday 18 February 2012

Dear Busy Bodies: Slow Cooker Coconut Lime Chicken

Fall off the bone chicken goodness. 
Last post of the reading break. Am I bored of cooking yet? Not a single bit. Wish so dearly I can cook like this all the time. If only eh? So Friday night, and I'm already thinking of my schedule for the next week and cooking for the next week. I guess this whole chicken business will last me at least 2 weeks. Assuming I don't eat it every meal. Which I can't. This is not a dish to have all the time. Now I know.

This dish is super easy. Honestly took me 5 minutes to throw everything together. Maybe I could've trimmed the chicken a bit. There was a significant amount of chicken grease. I spooned it out. As much as I could anyway. 

By cooking the chicken in a broth in the slow cooker, the meat just melted off the bones. I have no bones in the stuff that's in the fridge/freezer right now. It just falls right off! So if you are wanting to make this healthier, you can definitely go with chicken breast. All the meat gets juiced up and soaked in the sweetness of coconut and freshness of lime. Serve this on a bed of rice, quinoa, noodles, potatoes, or any starch and have whatever veges you want on the side and you've got yourself a meal. In my case, I've got myself at least 10 meals. My meals aren't big, I'm more a snacker than a mealer.

So here it is, last post of the reading break then it's back to one post a week. 

SLOW-COOKER COCONUT LIME CHICKEN

Total time: 4 hours
Actual working time 5 min

1 whole chicken (or whatever form of chicken you like)
1 can coconut milk (the standard size one)
1/2 can water
juice of 2 limes
3-4 slices of fresh ginger
2 tbsp brown sugar
salt to taste 
1. Put all your ingredients (except brown sugar and salt) in a slow cooker. Put chicken breast side down.
2. Cook on high for 4 hours.
3. Stir in the brown sugar and salt to taste at the end to prevent over-salting (I'm saying this because I over-salted)

*If you want to have natural sweetness instead, add some raisins into the cooking. I wish I did that instead of adding the brown sugar at the end. To be honest, the brown sugar was for compensating my over-saltedness, BUT, it really brings out the coconut milk sweetness, so I suggest add a little bit of sweetness to the mixture, whatever form you like.

Voila! You have yourself a super easy meal. No tending is needed. Although I tended quite a bit because I was impatient. Then the chicken burnt me. Some liquid splashed out. I have a small scar. Damn chicken. Now I shall have my revenge in devouring you!
My noseyness... I stabbed the chicken breast to let in the juices.
Enjoy!

Foods for the Soul- Spiced Ginger Loaf w/ Ginger Apple Butter


Ok, these are more foods for the fall but really, there is never a bad time for apple butter and a nice spiced loaf. Especially when the rain just keeps on coming down and the air hangs onto its winter chill. Also, you can't resist making apple butter when you bought the 10 apples for 2 dollars. Thank heaven for Root Cellar! 

This inspiration came from a jar of ginger pear butter in the renal dialysis unit that I volunteer in. It was the perfect balance of sweet and spicy. Since then, I wanted to make my own. Unfortunately, cheap pears were not available but apples were. So ginger apple butter it was. The loaf came from an inspiration when I was looking up a good ginger apple butter. It sounded too good to not try.

GINGER APPLE BUTTER

Thick, and sweet and warm to the heart.
Total time: 5.5 hours (not much tending to though)
Makes: approximately 4 cups of apple ginger butter

10 apples
3/4 cup apple juice
1/4 cup maple syrup
2-3 tbsp of grated ginger
3 tsp cinnamon
1 tsp nutmeg

1. Peel and core the apples. Chop into pieces.
2. Put everything in the slow cooker, cook on high for 3 hours.
3. Puree everything
4. Cook puree in slow cooker on high for 1.5 hours, uncovered. Stir once in a while.


You can definitely can it if you want or not and just use it up before it goes bad. I tried to can. I did can. But I don't trust my canning skills. This was my first time canning.

Made a lot more than what I can consume on my own, time for sharing!
SPICED GINGER LOAF
Inspired by http://www.roostblog.com/roost/a-harvest-gift-spiced-ginger-cakes-rosemary-apple-butter.html
Oven temp: 350F

2 1/2 cup almond flour
1/2 tsp baking soda
1 1/2 tsp cinnamon
4 tsp ground ginger
1/2 tsp cumin
1 tsp nutmeg
3 eggs
1/2 cup melted butter or oil
1/2 cup honey

1. Mix together all dry ingredients
2. Mix together all wet ingredients
3. Incorporate wet into dry until just mixed together
4. Bake in loaf pan for 45 min at 350F
5. Let cool for an hour before taking it out of the pan

This was quite a perfect combination. The apple butter was amazing on the loaf. The cumin in the loaf adds a little extra something to it. I took some to my massage therapist while the loaf was still warm. It was perfect timing as she is currently having a ton of ginger for her nausea from her pregnancy. Big congrats to Chantal and Perry, and Davis (the dog) in being parents/ big brother.

My whiteboard of craziness.